Showing posts with label Snacks. Show all posts

Camping Nachos

Ever been sitting around the campfire, having a beer or glass of wine and get an urge for a snack?  S'mores are great fun but don't go real well with beer (actually they go pretty well with wine, in my opinion. ) On one such night I tried to imagine how some of our favorite snacks could become campfire favorites and the next day I came upon these photos of nachos and knew this would fill the snack void during our next campfire.  Everyone loves nachos and this easy  method is so adaptable that it can accommodate anyone's fancy.  I adapted the recipe by combining several others and the photos are from a pinterest pin that credited The Inspired Dreamer blog (http://inspiredreamer.com)
You can almost make it just from the photos but here are some ingredients and directions.

Ingredients
  • FOR THE GARLIC CREAM SAUCE: or use a jar of prepared Ranch or Alfredo sauce
  • 1-½ Tablespoon Butter
  • ½ Tablespoons Olive Oil
  • 3 cloves Garlic, Minced 
  • ½ cups Heavy Cream(I substitute plain Greek yogurt but it has a little more tart flavor)
  • ¼ cups Milk
  • Salt and pepper
  • 1 pinch Red Pepper Flakes
  • ¼ cups Parmesan Cheese, Grated 
  • FOR THE NACHOS:
  • Tortilla Chips
  • ½ cups Garlic Cream Sauce (above)or use a jar of prepared Ranch or Alfredo sauce
  • ¼ cups Onion, Diced
  • ½ lb cooked hamburger or sausage meat (I brown it in advance and freeze in baggies) As an alternative you could use pepperoni, shredded chicken or a can of beans, rinsed
  • ½ cups Black Olives Sliced
  • ½ Green Bell Pepper, Diced
  • 1 cup favorite shredded cheese
  • Sliced jalapenos 

Melt the butter in a sauce pan. Make a roux by adding the Parmesan cheese to the melted butter and blend.   Add in the cream and milk stirring constantly till blended. Add in remaining sauce ingredients. Simmer on low do not boil.
Layer the chips in a dutch oven (or any pan that can withstand the heat of an oven/campfire,) pour sauce over chips and layer remaining nacho ingredients.
Heat in a 350F oven or place over coals till cheese is melted. If you cook on coals remember to have fireproof mitts or pot holders for dutch oven.

Have some tongs or a flat scoop nearby and dish the nachos onto paper plates. Bet there won't be any leftovers!

Cowboy Caviar, A San Antonio Favorite

Oh caviar!  The savory snack of the rich and famous.  I wouldn't have thought there was any food from the sea that I didn't like but I can do without caviar.  Little black, salty fish eggs, you either love it or hate it.

So when I heard about a neighbor's BBQ where Cowboy Caviar was to be one of the dishes, I assumed
that would be one dish I steer away from.  But once there, I saw the dish of color and beauty that you see here and was pleasantly surprised by the Mexican spices and fresh bounty of vegies in season. 

If you like the basic recipe, make sure to experiment with substituting other types of beans, adding salad sized shrimp, prepared pasta, serving as a side dish with meats or its traditional use, served with big tortilla chips for scooping.  Remember, you can also leave out a spice or vegie you don't like or have on hand.

 Ingredients:

2 c corn or 1 can
1/2 onion, chopped
1 c green or other color bell pepper, chopped
1 bunch green onions, chopped

1 c diced celery
2 jalapeno peppers, chopped (optional)
1 tablespoon minced garlic
1 pint cherry tomatoes, quartered
1 (8 ounce) bottle zesty Italian dressing (or 1/2 c oil and 1/4 c red wine vinegar plus salt and pepper & 1/4 c sugar)
1 (15 ounce) can black beans, drained and rinsed

1 (15 ounce can black eyed peas, drained and rinsed
1/2 teaspoon ground coriander (seeds from cilantro plant, ground)

1/4 teaspoon cumin or to taste (optional, not in the original recipe but it makes a nice addition) 
1 bunch chopped fresh cilantro or to taste


Instructions:

Chop the vegies rather small so they are consistent with size of the corn kernels.  In a large dish, mix everything together except the cilantro . I like to use a 9 X 13 dish because more of the vegies get more of the marinade. Cover and chill in the refrigerator 4 hours or more. I like to drain off the dressing and return a couple teaspoons just to keep it moist.  This cuts down on the calories from the oil in the dressing.  Toss with desired amount of fresh cilantro to serve.


Makes about 10 cups


Teri Blaschke is the RV Park operator of family owned HiddenValley RV Park in San Antonio, TX and writer of the park blog “A Little Piece of Country in San Antonio.” Teri contributes to various other blogs with a focus on either travel or social media and how it relates to the outdoor hospitality industry but her passion is serving the RV travel community by providing a memorable RV camping experience and growing the Hidden Valley RV family.  Connect with , Facebook, Pinterest and Twitter@HiddenValleyRV and our RV Country Daily Magazine and don't forget to Say hello to the voice of Hidden Valley 

What's So Good about a Pineapple?

 
If you're like me, you're always thinking of more ways to include fruit in your daily diet.  I like fruit but it so often gets over ripe in my refrigerator before I get around to eating it.  I just don't get in the fruit mood.  There are 2 exceptions to this.  One is watermelon, (think I could eat a whole one in one sitting) and the other is the

theRVGourmet, What's so Good About Pineapple-Plant
subject of today's post,  the simple pineapple.  Actually there are several reasons that the pineapple is unique and NOT so simple.

It probably initiated from Brazil and Paraguay and eventually made it's way to the Caribbean where Columbus "discovered" it and brought in back to Europe.  
theRVGourmet, What's so Good About Pineapple-Bromeliad

It's a member of the bromeliad family and only produces one fruit in it's lifetime.  It is extremely rare that bromeliads produce edible fruit. The pineapple is the only available edible bromeliad today.

It is a multiple fruit. One pineapple is actually made up of dozens of individual flowerettes that grow together to form the entire fruit. Each scale on a pineapple is evidence of a separate flower.

theRVGourmet, What's so Good About Pineapple-Flowers


According to my research pineapples stop ripening the minute they are picked and no special way of storing them will help ripen them further.  It seems to me that as they sit on the counter they tend to get sweeter but all I've read says this is not true,  How can you pick a ripe one?  Color is relatively unimportant in determining ripeness.
Choose your pineapple by smell.  If it smells fresh, tropical and sweet, it will be a good fruit.

The more scales on the pineapple, the sweeter and juicier the taste.

After you cut off the top (or better yet twist it off), you can plant it.
It should grow much like a sweet potato will.  According to the website BUZZLE this is the best procedure:


theRVGourmet, What's so Good About Pineapple-how to grow
Courtesy of  Buzzle: http://www.buzzle.com/articles/growing-pineapple-plants-how-do-pineapples-grow.html


Choosing a Pineapple: The pineapple that you have chosen for growing at home need to be brownish in color; leaves must be green. Avoid using pineapples that have yellowish leaves.
Preparing the Crown for Rooting: The pineapple plant is commonly cultivated from the crown. It is advisable to pull off the crown from the fruit by twisting it; this way, the crown comes out clean without any flesh adhering to the base. Removing the lower leaves reveals the base of the crown. You may find a few short roots at the base.
Rooting: The process of rooting requires the crown to be kept immersed in water for about 3 weeks. You will have to replace the water in the container regularly.
Planting: The process of planting the pineapple crowns begins with selecting a proper soil medium for its growth. Also, the layers in which these media are arranged holds great importance. For example, the bottom layer is formed of pebbles which allow proper drainage of water. Above this layer, you should spread soil that is mixed with a medium like perlite. Crown should be planted in this layer of soil and then the soil watered. It takes about 6 weeks for the roots to gain hold in the soil. By the end of 2 months, the pineapple plant gets firmly rooted in the soil.

This delicious fruit is not only sweet and tropical; it also offers many benefits to our health. Pineapple is a remarkable fruit. 

  • It is valuable for easing indigestion, arthritis or sinusitis.
  • The juice has an anthelmintic effect; it helps get rid of intestinal worms. 
  • Pineapple is high in manganese, a mineral that is critical to development of strong bones and connective tissue. A cup of fresh pineapple will give you nearly 75% of the recommended daily amount. It is particularly helpful to older adults, whose bones tend to become brittle with age.
  • Bromelain, a proteolytic enzyme, is the key to pineapple's value. Proteolytic means "breaks down protein", which is why pineapple is known to be a digestive aid. It helps the body digest proteins more efficiently. 
  •  Bromelain is also considered an effective anti-inflammatory.Regular ingestion of at least one half cup of fresh pineapple daily is purported to relieve painful joints common to osteoarthritis. It also produces mild pain relief.
  • Fresh pineapple is high in Vitamin C and because of the Bromelain, it has the ability to reduce mucous in the throat.  It is commonly used in Europe as a post-operative measure to cut mucous after certain sinus and throat operations.
  •  Pineapple is also known to discourage blood clot development. This makes it a valuable dietary addition for frequent fliers and others who may be at risk for blood clots.
  • An old folk remedy for morning sickness is fresh pineapple juice. My daughter-in-law said it really works! Fresh juice and some nuts first thing in the morning often make a difference.
  • It's also good for a healthier mouth. The fresh juice discourages plaque growth.
So, no matter how you cut it up, juice it or add it to salads and other cold dishes, fresh pineapple is a miracle fruit.  No wonder we like it so much. 

Let's put together some favorite recipes with ineapple to celebrate this tropical delight.  You can add your favorites in the comments or send them for future publication to info@HiddenValleyRV.net.


Teri Blaschke is the RV Park operator of family owned HiddenValley RV Park in San Antonio, TX and writer of the park blog “A Little Piece of Country in San Antonio.” Teri contributes to various other blogs with a focus on either travel or social media and how it relates to the outdoor hospitality industry but her passion is serving the RV travel community by providing a memorable RV camping experience and growing the Hidden Valley RV family.  Connect with , Facebook, Pinterest and Twitter@HiddenValleyRV and our RV Country Daily Magazine and don't forget to Say hello to the voice of Hidden Valley 


S'mores Cookies

Seen these little gems all over the web and was dying to try them at one of our bonfires.  With summer in Texas, the chocolate is melted before you lay it on the marshmallow and we always lose half the marshmallows in the fire so these looked like the perfect solution. Very easy and the perfect combination of crispy and chewy.    
Source: Ice Cream Before Dinner

Ingredients:
11 Tablespoons unsalted butter, softened
1 cup brown sugar, packed
½ cup granulated sugar
2 large eggs
1 teaspoon vanilla
1 teaspoon baking soda
½ teaspoon sea salt (regular salt will do)
1 teaspoon cinnamon
2 ½ cups flour
1/2 cup semi-sweet chocolate chips
1 cup mini marshmallows
3 regular sized Hershey’s bars, broken into pieces
1-2 packages graham crackers, broken into squares

Instructions:
In a medium bowl, whisk together the flour, baking soda, sea salt and cinnamon to combine. Set aside.

In the bowl of an electric mixer, cream butter with white and brown sugar until light and fluffy. Add the eggs and vanilla and mix until combined.
Add the flour mixture to the butter mixer and combine on low speed.
Fold in the chocolate chips and marshmallows. Chill dough in refrigerator for 1 hour to overnight (I did one batch right away and another after chilling overnight and found there was no difference.)

Preheat the oven to 375 degrees. Line baking pans with parchment paper. I used one 11x17 pan and one 9x13 pan but you can really use any sized pans you want.
Lay out graham crackers side by side on the pans as close as possible (they should be touching). I used 16 graham cracker squares on one pan and 10 squares on another. You may have to add or remove graham crackers according to how much dough you have. If you want your cookies thicker you will use more dough and less graham crackers.

Place tablespoons of dough on graham crackers about 1 – 1 ½ inches apart. I averaged about 1 1/2 tablespoons of dough per graham cracker square as seen in the picture above. Press down slightly with fingertips.

Bake for 5 minutes then remove from oven to press Hershey’s bar pieces on to the top. You can place as many pieces or as little as you want depending how much chocolate flavor you want.

Bake for 5 – 7 more minutes or until dough is beginning to turn golden brown at the edges. Remove to a wire rack to cool. For clean cutting make sure cookies are completely cool and cut with a sharp knife.
 
On my next try I'm going to use pre-made chocolate cookie dough and see how they turn out.  If you beat me to it with the experiment, comment below and let me know how they turned out. 
What's your favorite variation on s'mores?  

Fruity, Gooey and Warm


While S'Mores are traditional bonfire fare, these STUFFED GRILLED BANANAS are a somewhat healthier and very unique alternative. A little advance thought into choosing your favorite toppings and fillings and having them on hand will make this your "go to" dessert for an evening by the fire with friends and family. Add to the deliciousness, the fact that there are no dishes or clean up...and that's my kind of food. It's been a long time addition to our bonfires at Hidden Valley cause we never know how many will show up and you can always use leftover bananas so there's no waste.

Put together some topping ideas: peanut butter, chocolate or toffee chips or broken chocolate bar bits, coconut, nuts, berries, mini marshmallows or caramel bits. Have enough bananas for one banana per person. I promise they won't want to share. Slit the bananas in half lengthwise, but be careful not to cut all the way through to the bottom. Spread apart the peel a bit and stuff full of the toppings. Place on a foil lined grill for about 5 minutes, or until the bananas are heated and the toppings are softened and melty.

Alternatively, you can wrap it in the foil with the top slightly open and lay it safely on a side portion of a fire pit. We've even done them on a marshmallow roasting fork. With this method I like to roast it alone over the fire first then after the skin turns a little dark (a couple minutes) remove fork from the fire, slit fruit in half, adding the toppings. They melt almost immediately but a few extra seconds of roasting over the fire will finish the job. With kids among us, the final roasting can be foregone in the interest of not losing your fruit in the fire with all those luscious toppings.


Grab a spoon and scoop away.

Keep this a secret but I'm not above sticking one of these in the microwave, no foil of course.


Aren't these scrumptious?


Cheesecake in Natural Containers


These are to die for and can be made in just a few minutes for a quick elegant dessert. Great for a potluck or as snacks on Super Bowl Sunday too. 

You need: 

dozen or more large strawberries
8 oz cream cheese (I used low fat)
8 oz cool whip
2-4 TBSP powdered sugar
1-2 tsp vanilla
1/2 C graham cracker crumbs
Chocolate syrup, melted chocolate or shaved chocolate (optional)

  • Cut out the stem, making a little hollow in the top of the berry.
  • Mix softened cream cheese,cool whip, powdered sugar and vanilla. 
  • Put the mixture in a ziploc bag and cut off a small corner to pipe the filling inside. 
  • Top with graham cracker crumbs or dip in upside down.
You can leave out the cool whip if you like, I think it's a bit heavy with just the cheese, but that's just me :) I think for a romantic dessert I might dip them in chocolate, or maybe drizzle chocolate on them.  A mint leaf also dresses them up.

I always want to experiment with how well or long they will store in the refrigerator but they're always scarfed up with no leftovers. So i you have any leftovers,  let me know how they taste the next day.  I won't hold my breath.  hehe!

An Alternative Snack

Spicy Pretzel Sticks

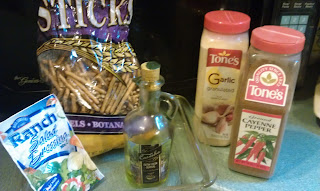
I have a passion for chips and could eat the whole bag if someone doesn't move them away from me.  I'm always looking for something salty that's a little healthier. These Hot Sticks fit the bill, are real easy and go over great at all our RV get togethers. You can leave out or modify the red pepper.
Ingredients:


1 envelope ranch dressing mix
½ t. garlic powder
½ t. ground red pepper
½ C. oil
1 bag pretzel sticks

Instructions:

Combine all ingredients except pretzels. Place the pretzels in a shallow pan. Pour the mixture over pretzels and mix until well coated. Bake in oven at 200 degrees for 1 hour.

Note: I've also used other dip mixes besides Ranch dressing, like Cucumber cream, Mexican or Asian spice, etc. and all were great. I've also added other crispy munchies like chex mix or other bitesize snacks to the mix.  Experiment with other spice mixes to vary the flavors.

Yummy with just the right amount of spice. 

A Meal or a Snack?

Hot Artichoke Crab-meat Dip


I was reminded of this recipe while reading the RV Centennial Cookbook.  I've made spinach artichoke dip with the same recipe for years and always loved it, by using a 10 oz box of frozen spinach, defrosted and squeezed dry, instead of the crabmeat.  My family loves an addition of red pepper flakes to the finished product to add some "heat."  In the spinach artichoke version we also like bacon bits.  Our favorite dipper is a grainy, or blue corn chip.
A novel way to serve a creamy dip is in a hollowed out rustic bread loaf .  If you use this idea, cut the center section you hollow out, into small cubes and serve them with toothpicks on the side for dipping.


 Ingredients:
1 8 oz.package softened cream cheese
¼ C. mayonnaise
1 garlic clove, pressed
1 can (14 oz.) artichoke hearts in water, drained and chopped
1 package (8 oz.) imitation crabmeat, chopped or 7oz can of crabmeat (1 ½ C.)
¼ C. (3 oz.) grated fresh Parmesan cheese
⅓ C. thinly sliced green onions with tops
zest of 1 lemon (1 t.)
⅛ t. ground black pepper
⅓ C. chopped red bell pepper

Instructions:

Preheat oven to 350 degrees. Combine cream cheese and mayonnaise. Mix well. Press garlic into mixture. Drain artichokes; chop and mix with crabmeat. Combine Parmesan cheese, green onions, and lemon zest. Mix all ingredients together and add to cream cheese mixture. Spoon mixture into a 1½ qt. baking dish. Bake 25 to 30 minutes or until golden brown around the edges. Sprinkle with red bell pepper and additional green onions.

Another variation with creamy dips is to spread a small portion on a flour tortilla and roll up.  They can either be served as pictured or cut into little round bite sized spirals.  
BTW, you'll be tempted to make this as a meal side dish or even a meal once you try it.   ENJOY!

Taco Dip

Taco Dip

The simplest of dips but always a favorite at our get togethers. 

Ingredients:
8 oz. cream cheese
1 package dry taco seasoning mix
½ C. sour cream
guacamole
finely shredded lettuce
finely shredded Monterey jack or cheddar cheese
Finely chopped tomatoes
sliced black olives


Optional Trimmings:
bell pepper
cilantro (chopped)
salsa
jalapenos

Instructions:

Mix together the cream cheese, sour cream, and taco seasoning until completely blended.
Spread onto a flat dish.
Spread a layer of guacamole over the dip mix.
Top the mixture with lettuce, cheese, tomatoes, bell pepper and black olives. Serve with tortilla chips.

The Legendary Nanaimo Bar

From Vancouver Island, British Columbia and now to Hidden Valley, these little bars were one of several desserts that we munched, savored and enjoyed this past weekend at our "Just Desserts" event. 

First Layer:
With Vanilla Filling
1/2 CUP Butter, Melted
1/2 CUP Brown Sugar
5 TBSP Cocoa Powder
1 Egg, Beaten
1 3/4 CUPS Graham Wafer Crumbs
1 CUP Flaked Coconut (a little less is fine or substitute more graham wafer crumbs if allergic)
1/2 CUP Chopped Walnuts or almonds.
To make first layer: Combine ingredients and pat into a 9” square ungreased pan. Chill for 1/2 hour.
With Pistachio Filling

Second Layer
2 CUPS 10X (Icing) Sugar
1/4 CUP Butter, Softened
1/4 CUP Cream or Milk
2 TBSP Custard Powder (vanilla, pistachio or mint)
To make second layer: Beat all ingredients until smooth and fluffy. Spread carefully on top of first layer

Third Layer
3 x 1 Oz. Chocolate Squares(sweet or semi-sweet)
1/4 CUP Butter
To make third layer: Melt chocolate and butter together. Spread over second layer and chill. Cut in small bars – very rich and very delicious!


Great With Margaritas or a Cold Brew

San Antonio 7 Layer Dip
San Antonio Seven-Layer Dip
A Texas favorite during happy hour, Superbowl Sunday and pot lucks.
12 Servings

Prep Time: 15 to 30 Minutes, depending on if you use prepared guacamole and re-fried beans or homemade.


Ingredients:
1 package prepared Guacamole or homemade.
1 can (14 1/2 oz.) or homemade Re-fried Beans
1 1/2 cups Sour Cream
1 cup Shredded Cheddar Cheese
2 cups shredded iceberg lettuce (about 1/2 head)
2 cups chopped tomatoes
6 green onions, chopped with tops
Sliced jalapenos (optional)
1 bag (16 oz.) Corn Tortilla Chips

Directions:
1. Prepare guacamole according to package directions or make your own (2  avocados mashed with a fork, seasoned with salt, pepper, garlic powder, lime squeeze, hot sauce) and set aside.

2. Spread beans on the bottom of a 2-quart glass baking dish and top with layers of guacamole, sour cream, cheese, lettuce, tomatoes, and onions and jalapenos, if desired.

3. Serve with corn chips.  An assortment of Blue, white and yellow corn chips is a nice touch.
Related Posts Plugin for WordPress, Blogger...